Table of Contents
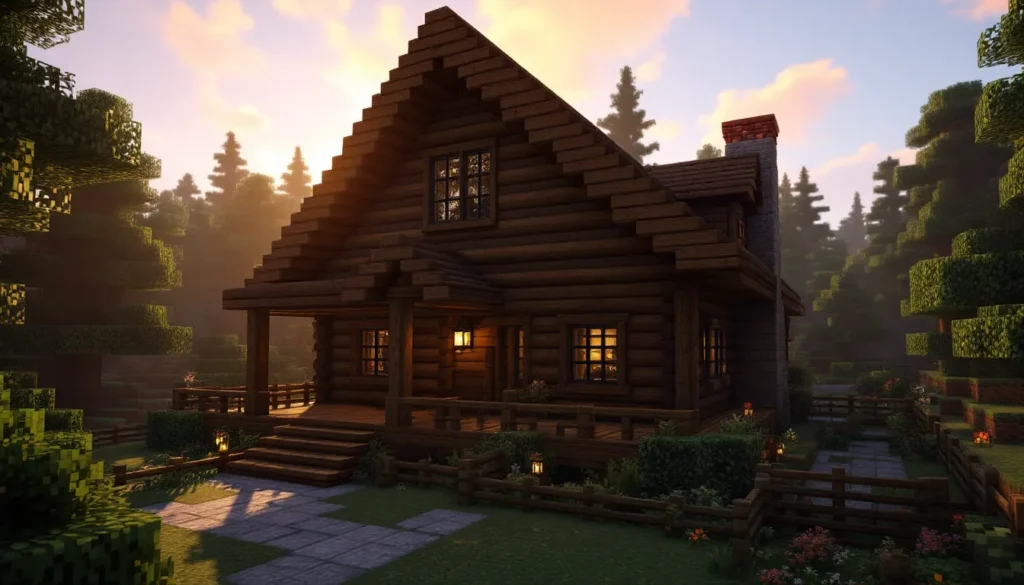
ToggleThere’s something timeless about the log cabin in Minecraft. It’s the build that millions of players return to, whether they’re starting fresh in a new survival world or just want a cozy base that feels like home. Unlike the generic dirt huts or cobblestone boxes that most players throw together on night one, a well-crafted log cabin has character, warmth, and a rustic aesthetic that fits perfectly into almost any biome.
This guide breaks down everything players need to know about building a log cabin in Minecraft, from material selection and location scouting to step-by-step construction and interior design. Whether someone’s a beginner looking for their first proper shelter or a veteran builder wanting to refine their cabin game, this guide covers the essentials and advanced techniques to create a structure that’s both functional and visually satisfying.
Key Takeaways
- A Minecraft log cabin balances simplicity and aesthetics using renewable wood resources, making it ideal for both survival beginners and experienced builders seeking a cozy base.
- Oak and spruce logs are the most popular choices for log cabin construction, with oak offering a traditional rustic look and spruce providing a darker, weathered aesthetic suited for taiga biomes.
- Foundation, flooring, and wall construction form the core structure, but roofing with gable peaks, overhangs, and proper window placement define a cabin’s iconic silhouette.
- Interior design transforms a basic shelter into a lived-in home—prioritize crafting stations, storage, a bed, and thoughtful lighting with lanterns and campfires to create warmth and atmosphere.
- Environmental integration through terraforming, custom vegetation, pathways, and exterior details like chimneys and porches makes your log cabin feel organic and connected to the surrounding landscape.
- Common pitfalls include building too small, ignoring roof details, using full glass blocks, and skipping decorative touches—avoid these to elevate your cabin from functional shelter to showcase build.
Why Log Cabins Are Perfect for Minecraft Survival
Log cabins hit the sweet spot between simplicity and aesthetics. They’re accessible early in the game since wood is one of the first resources players gather, yet they scale beautifully into mid- and late-game builds with the right detailing and interior work.
The material cost is reasonable. Unlike builds that demand massive amounts of stone brick, quartz, or rare blocks, a log cabin can be constructed entirely from renewable resources. Trees respawn naturally or can be farmed, making it easy to expand or repair the structure without mining expeditions.
Visually, log cabins blend seamlessly into natural environments. They don’t stick out like modern glass towers or floating bases. A cabin nestled into a forest, taiga, or mountain biome feels organic, like it belongs there. This makes them ideal for players who prefer immersive, role-play-friendly builds over flashy mega-structures.
Functionality is another win. The interior space is flexible, supporting everything from basic storage and crafting stations to enchanting setups, farms, and sleeping quarters. The warm tones of wood blocks create a cozy atmosphere that concrete or stone simply can’t match.
Materials You’ll Need to Build Your Log Cabin
Best Wood Types for Your Cabin Aesthetic
Minecraft offers multiple wood types as of version 1.20 and beyond, each with distinct color palettes and textures. Choosing the right wood sets the tone for the entire build.
Oak logs are the classic choice. Their medium brown tone is neutral and traditional, making them the go-to for rustic, old-world cabin vibes. Oak is abundant in most biomes and pairs well with stone, cobblestone, and dark oak accents.
Spruce logs bring a darker, cooler aesthetic. The deep brown-gray hue works exceptionally well in taiga, snowy, or mountain biomes. Spruce cabins feel rugged and weathered, perfect for survival-focused builds. Many builders combine spruce logs with oak planks for contrast.
Dark oak logs are bold and modern by log cabin standards. The almost-black bark creates striking corner posts and framing. But, overuse can make a cabin feel heavy or oppressive, so it’s often used sparingly alongside lighter woods.
Birch logs offer a bright, clean look with their white bark. They’re less traditional for cabins but work beautifully in plains or flower forest biomes. Birch cabins feel airy and cottage-like rather than rustic.
Acacia, jungle, mangrove, and cherry logs are more niche. Acacia’s orange-red tones suit savanna builds. Jungle wood’s pinkish hue is quirky but harder to pull off. Mangrove’s reddish-brown works for swamp or tropical cabins. Cherry wood, introduced in 1.20, brings a pale pink aesthetic that’s more whimsical than traditional.
Most builders stick to oak or spruce for their first cabin, then experiment with combinations once they’re comfortable with the basics.
Additional Building Materials and Tools
Beyond logs, a few supplementary materials elevate the build:
- Planks: Used for flooring, roofing, and interior walls. Match or contrast with log types.
- Stairs and slabs: Essential for roof detailing and furniture. Craft these from planks.
- Cobblestone or stone bricks: Perfect for chimneys, foundations, or pathways. Adds texture variation.
- Glass panes: Windows let in light and break up solid walls. Avoid full glass blocks, they look clunky.
- Trapdoors and doors: Functional and decorative. Spruce and dark oak trapdoors are especially versatile.
- Fences and gates: Great for porches, railings, or outdoor pens.
- Stone or brick blocks: Optional for accent features like fireplaces or support pillars.
Tool-wise, an iron axe or better speeds up log collection significantly. A crafting table, furnace, and bed should be set up nearby during construction for convenience.
Choosing the Perfect Location for Your Log Cabin
Biome Considerations
Location shapes the entire feel of a cabin build. Some biomes naturally complement log cabins, while others require more effort to make the aesthetic work.
Taiga and snowy taiga biomes are cabin paradise. Dense spruce forests, snow-dusted terrain, and rolling hills create the ideal backdrop. Resources are plentiful, and the environment already feels rustic. Many players consider taiga the gold standard for cabin builds and survival bases.
Forest and dark forest biomes are equally strong choices. Oak and birch trees provide easy access to building materials, and the canopy overhead adds natural ambiance. Dark forests have a moodier, more secluded vibe.
Plains biomes offer flexibility but lack the natural cover of forests. Cabins here feel more exposed, so adding custom landscaping, trees, bushes, or stone paths, helps integrate the build into the environment.
Mountain and windswept hills biomes are excellent for dramatic builds. Nestling a cabin into a hillside or cliff face creates visual interest and shelter from mobs. The elevation also provides scenic views.
Swamps, deserts, and jungles are less conventional but workable. Swamp cabins can lean into a weathered, overgrown aesthetic. Desert cabins require material substitutions (acacia, sandstone). Jungle cabins often incorporate elevated designs to deal with uneven terrain.
Terrain and Proximity to Resources
Flat or gently sloped terrain simplifies construction. Building on steep hills or cliffs looks impressive but demands more planning and terraforming. New builders should start on flatter ground.
Proximity to key resources matters in survival mode:
- Wood: Forests nearby ensure easy material resupply.
- Water: A river, lake, or ocean within view adds visual appeal and functional access.
- Caves or mineshafts: Close mining access speeds up resource gathering.
- Villages: Nearby villages offer trading, food, and loot. Not essential but convenient.
- Mob spawner isolation: Avoid building directly next to dark caves or ravines unless planning to light them up.
Scout the area before committing. Walk a 100-150 block radius to confirm the biome feels right and resources are accessible. It’s frustrating to finish a build only to realize the nearest forest is 500 blocks away.
Step-by-Step: Building Your First Log Cabin
Planning Your Cabin Dimensions and Layout
Before placing a single block, decide on size and layout. Beginners often build too small and regret it when adding storage or farms.
A starter cabin can be as modest as 7×7 or 9×9 blocks. This provides roughly 49-81 square blocks of interior space, enough for a bed, crafting table, furnace, and a few chests. It’s cozy but functional.
A standard cabin sits around 11×9 or 13×11 blocks. This allows for room division, sleeping area, storage, crafting zone, without feeling cramped. Most players find this range comfortable for solo survival.
Larger cabins (15×15 or bigger) support multiple rooms, staircases, or themed areas. These are better suited for mid-game builds when material gathering is faster.
Sketch the layout mentally or in-game using dirt blocks as placeholders. Decide where the door will go, how many windows, and whether the interior will be open-plan or divided.
Constructing the Foundation and Floor
Start with the foundation. Clear the build area of grass, flowers, and uneven terrain. Some builders lay a cobblestone or stone brick foundation one block below ground level for a finished look, but this is optional.
Lay the floor using planks. Matching or contrasting wood types both work, oak planks with spruce logs, for example. Avoid using full log blocks for flooring: they look bulky and unnatural indoors.
For a 9×9 cabin, that’s 81 planks. For an 11×9, it’s 99 planks. Gather materials accordingly.
Building the Walls and Corner Detailing
This is where the cabin takes shape. The classic log cabin aesthetic uses logs as corner posts and framing, with planks or additional logs filling the walls.
Method 1: Full log walls
Place logs vertically (oriented upward) around the perimeter. This creates solid, chunky walls. Simple but can feel monotonous without detailing.
Method 2: Log frame with plank infill
Place logs at each corner, running vertically from floor to ceiling. Connect them with horizontal log beams at the top and bottom. Fill the space between with planks. This method adds depth and texture.
Method 3: Alternating logs and planks
Alternate log and plank blocks horizontally or vertically. Creates a striped or paneled effect. More decorative than structural-looking.
Most builders use Method 2 for the most authentic log cabin feel. Corner logs should be placed facing outward so the bark shows on two sides, emphasizing the framing.
Walls should be at least 4-5 blocks tall for comfortable interior headroom. Taller walls (6-7 blocks) suit two-story cabins or vaulted ceilings.
Leave gaps for windows and the door. Windows are typically 2 blocks wide and 1-2 blocks tall. Place them symmetrically for balance. Install glass panes, not full glass blocks, for a refined look.
Creating the Roof Structure
Roofs define the cabin’s silhouette. A poorly designed roof ruins an otherwise solid build.
Gable roofs (peaked, triangular) are the most common. They’re simple to construct and iconic for log cabins. Build the roof using stairs and slabs in the same or contrasting wood type.
Start by placing a row of stairs along the top edge of one wall, facing inward. Mirror this on the opposite wall. Continue layering stairs inward and upward, forming a peak. Fill gaps with slabs to create a smooth surface.
Overhang is critical. Extend the roof 1-2 blocks beyond the walls on all sides. This creates depth, shadows, and a more realistic appearance. Use upside-down stairs or slabs for the underside of the overhang.
For a 9×9 cabin, the roof peak will sit around 3-4 blocks above the walls. Adjust steepness by changing the stair angle or adding more layers.
Alternative roof styles include flat roofs (less traditional), hip roofs (slopes on all four sides), or asymmetrical roofs for a more organic look. Beginners should stick with gable roofs until comfortable with stair and slab mechanics.
Interior Design Ideas for Your Log Cabin
Essential Furniture and Functional Blocks
A bare cabin is just a box. Furnishing it properly makes it feel lived-in.
Crafting and storage area:
- Place the crafting table and furnace near the door or along one wall for easy access.
- Add chests (single or double) for storage. Barrels work too and stack vertically to save space.
- Consider a smoker and blast furnace for specialized smelting once available.
Sleeping area:
- The bed is non-negotiable in survival. Position it away from the door, ideally in a corner or alcove.
- Add a rug (carpet blocks) underneath or nearby for decoration.
- Place item frames with tools or maps on the wall above the bed.
Seating and tables:
- Craft simple tables using fence posts topped with pressure plates or trapdoors.
- Chairs can be made from stairs or slabs with trapdoors as armrests.
- Alternatively, use barrels or composters as stools.
Decorative touches:
- Hang paintings or place flower pots on windowsills.
- Add a bookshelf or two for a cozy library vibe, especially if planning an enchanting setup.
- Use trapdoors, slabs, and stairs creatively to build cabinets, shelves, or counters.
Enchanting station (mid-game):
- Place an enchanting table surrounded by bookshelves (15 for max level enchants). This fits naturally into a cabin corner or dedicated side room.
Lighting and Atmosphere
Poor lighting kills the ambiance. Too dark, and the cabin feels oppressive. Too bright, and it loses coziness.
Torches are the survival default but look utilitarian. Place them sparingly on walls or hidden behind furniture.
Lanterns (introduced in 1.14) are superior for cabin aesthetics. Hang them from the ceiling using chains or place them on fence posts. They emit the same light level as torches but look far more refined.
Campfires add warmth and atmosphere. Place one in the center of the room or build a stone fireplace with chimney along one wall. Campfires don’t emit as much light as torches, so supplement with lanterns.
Glowstone or sea lanterns hidden under carpets or behind trapdoors provide invisible lighting. This technique keeps the cabin bright without cluttering walls.
Candles (added in 1.17) work beautifully on tables, shelves, or windowsills. Cluster them in groups of 2-4 for decorative lighting.
Aim for a warm, even light distribution. Avoid harsh shadows or overly bright spots. The goal is a glow that feels like firelight, not a floodlit warehouse.
Advanced Log Cabin Variations and Upgrades
Two-Story Log Cabins
Expanding vertically adds space without increasing the footprint. A second story suits players who want separate living and storage areas or a loft-style bedroom.
Build the first floor as normal, then add a second layer of walls on top, matching the original structure. Install an internal staircase using stairs blocks, typically in a corner to save space.
The second floor can have a full ceiling or be left open as a loft with railing. Use fences or trapdoors for railings to prevent falls.
Roof construction for two-story cabins is taller and steeper. Expect the roof peak to sit 6-8 blocks above the ground floor. The added height makes the cabin more imposing and visually interesting.
Adding Porches, Balconies, and Chimneys
Porches transform a cabin from basic to charming. Extend the floor 2-3 blocks outward from the entrance. Add fence railings or low walls (slabs) along the edges. Place stairs or slabs as steps leading down to ground level. Hang lanterns from the porch ceiling or place potted plants in the corners.
Balconies work similarly but attach to second-story walls. Extend the floor outward, add railings, and connect with an exterior door. Balconies overlooking forests or mountains add serious aesthetic value.
Chimneys are iconic but easy to mess up. Build a vertical stone, cobblestone, or brick column starting from a ground-floor fireplace and extending through the roof. The chimney should protrude 2-4 blocks above the roof peak. Cap it with slabs or stairs to finish the top. Make sure the chimney is wide enough (2×2 or 3×3 blocks) to look substantial, not spindly.
Inside, place a campfire at the base of the chimney. For realism, knock out ceiling blocks directly above the campfire so smoke can “escape” through the chimney, though smoke particles don’t actually render through solid blocks in Minecraft.
Common Mistakes to Avoid When Building Log Cabins
Building too small: It’s tempting to keep the cabin compact, but undersized interiors become frustrating. Always build slightly larger than initial estimates. It’s easier to leave space empty than to tear down walls later.
Flat, uninteresting roofs: A roof that’s too shallow or lacks overhang looks unfinished. Always extend the roof at least one block past the walls and use stairs/slabs for texture.
Symmetry obsession: Perfect symmetry can look stiff and artificial. Offset windows slightly, vary roof heights, or add an asymmetrical porch. Real cabins have quirks.
Ignoring the surroundings: A cabin plopped onto bare dirt with no landscaping feels disconnected. Add a small garden, stone path, fence, or custom trees. Blend the build into the terrain rather than fighting it.
Using full glass blocks for windows: Glass panes are thinner and more refined. Full blocks make windows look chunky and out of place on a cabin.
Overusing a single wood type: All oak or all spruce can feel flat. Mix in a second wood type for accents, dark oak corners on a spruce cabin, oak trim on birch walls. Contrast adds depth.
Neglecting interior lighting: Torches stuck randomly on walls kill the vibe. Plan lighting with lanterns, campfires, and hidden sources to create warmth without clutter.
Skipping the details: A cabin without furniture, rugs, paintings, or exterior landscaping is just a shell. The difference between “okay” and “great” is in the small touches.
Tips for Blending Your Cabin Into the Environment
A cabin should feel like part of the landscape, not an alien structure dropped from orbit.
Terraforming is key. Smooth out harsh terrain edges, fill in holes, and plant grass or flowers around the perimeter. If building on a slope, terrace the land with stone or dirt layers to create natural steps.
Custom trees and foliage help immensely. Plant 2-3 trees near the cabin using saplings. Add bushes (leaf blocks placed low) and flowers for color. If in a taiga, scatter snow layers around the base.
Pathways connect the cabin to the environment. Use dirt paths (created by right-clicking grass with a shovel), gravel, or cobblestone to carve trails leading to nearby resources, villages, or secondary structures.
Stone accents ground the build. Place cobblestone or stone bricks at the base of the cabin as a foundation trim. Add a small stone well or campfire ring outside. These elements break up the all-wood aesthetic and imply age and use.
Fencing and pens add life. Build a small fence enclosure for animals (cows, chickens, sheep) near the cabin. It looks functional and lived-in. Add a gate and a feeding trough (fence posts with trapdoors).
Lighting extends beyond the interior. Place lanterns on fence posts along paths, near the door, or around the perimeter. This creates a welcoming glow at night and prevents mob spawns.
Water features are optional but impactful. If a stream or pond is nearby, integrate it into the landscape. Add a small wooden dock or bridge if the cabin overlooks water. If no water exists naturally, dig a small pond and surround it with stone and plants.
Seasonal adaptation: In snowy biomes, let snow accumulate on the roof and ground naturally (it will in-game). In forests, allow vines or leaves to drape over parts of the cabin for an overgrown look. These touches make the build feel weathered and organic.
Builders aiming for realism should environmental integration techniques often discussed in modding and building communities, where terrain blending is taken to the next level.
Conclusion
A well-built log cabin is more than just a shelter, it’s a statement of intent. It says the player values aesthetics, immersion, and thoughtful design over quick efficiency. Whether it’s a humble 7×7 starter or a sprawling two-story estate with balconies and chimneys, the cabin archetype endures because it works.
The beauty of the log cabin is its scalability. Start simple, refine over time, and let the build evolve with the playthrough. Add rooms, upgrade materials, expand into a compound with barns and workshops. The foundation is timeless, and the possibilities are limited only by creativity and resource availability.
For players starting a fresh survival world in 2026, the log cabin remains one of the most satisfying early-game builds. It’s accessible, functional, and sets the tone for everything that follows. Now grab an axe, find a good forest, and start building.