Table of Contents
ToggleBuilding a barn in Minecraft transforms a scattered collection of animals and crops into something that actually feels like a working farm. It’s one of those builds that straddles the line between functional and aesthetic, you need space for livestock, storage for crops, and enough visual appeal that you’re not embarrassed when friends join your server. Whether players are deep into a survival world or experimenting in creative mode, a well-designed barn pulls together the agricultural side of Minecraft in a way that hay bales scattered across a field just can’t match.
This guide walks through everything from material selection to advanced design features, covering barn builds for every skill level and style preference. Players will find step-by-step construction tips, interior layout strategies, and creative variations that work in 2026’s current Minecraft version (1.20+). No filler, no vague suggestions, just actionable building techniques for creating barns that look authentic and serve a purpose.
Key Takeaways
- A well-designed barn in Minecraft centralizes farm operations by protecting livestock from mobs, organizing storage, and creating a visual landmark that makes your world feel lived-in.
- Material choices matter for authenticity—use spruce wood for traditional barns, pair it with stone foundations and red terracotta roofing, and add timber-frame details to avoid a bland box appearance.
- Plan interior dimensions first (allocate roughly 1/3 space each for animal pens, storage, and walkways), then build walls around them to avoid undersized interiors and ensure functional layouts.
- Timber-frame construction with visible log posts every 3–4 blocks and horizontal beams at mid-height creates authentic visual texture and separates impressive barns from generic structures.
- A gable or gambrel roof with proper pitch (1:1 to 2:1 rise:run ratio) is essential for authentic barn aesthetics, and details like haylofts, split-doors, and lantern lighting transform basic builds into showcase-worthy farms.
- Integrate your barn into a complete farm layout by positioning it centrally near crop fields, connecting with dirt paths, and adding supporting structures like silos or tool sheds for cohesive agricultural design.
Why Every Minecraft Farm Needs a Well-Designed Barn
A barn solves multiple problems that crop up in every farm-heavy world. Animals wander, despawn, or get picked off by mobs when left in open pens. Crops and harvested items end up stored in random chests scattered across the landscape. A dedicated barn centralizes everything.
From a gameplay perspective, barns provide mob-proof housing for livestock, keeping cows, pigs, sheep, and chickens safe from creepers and phantoms. They also create dedicated storage areas where players can organize wheat, carrots, seeds, and animal products without cluttering their main base.
Visually, barns anchor a farm build. They give scale and structure to what might otherwise look like empty fields with fence posts. A red barn with a pitched roof becomes an instant landmark, making navigation easier and the world feel more lived-in. For multiplayer servers, a well-built barn signals that someone’s put thought into their setup, it’s the difference between a random dirt hut and an actual homestead.
Essential Materials and Blocks for Building a Minecraft Barn
Choosing the right blocks separates barns that feel authentic from ones that look like generic wooden boxes. Material choice affects both the visual style and the gathering effort required.
Best Wood Types for Authentic Barn Construction
Spruce wood remains the go-to for traditional barns. Its darker brown tone mimics aged wood and contrasts well with lighter materials. Spruce planks form the primary walls, while spruce logs work perfectly as corner posts and structural beams.
Oak wood serves as a secondary option, especially for barns aiming for a lighter, more cheerful aesthetic. The warm tan color pairs well with stone foundations. Dark oak provides an even deeper tone for barns in darker biomes or medieval-themed builds.
Many builders mix wood types for texture, spruce planks for walls with oak or dark oak logs as framing creates visual depth without looking messy. Stripped logs add a cleaner modern touch, while regular logs with bark feel more rustic.
Stone and Decorative Block Options
Cobblestone and stone bricks create sturdy foundations and lower walls. They ground the structure visually and suggest permanence. Andesite offers a grayer alternative that works in plains or mountain biomes.
For roofing, red terracotta or red concrete delivers that classic barn red color. Brick blocks provide another red option with more texture. Some builders prefer dark oak stairs or spruce stairs for wooden roofs, especially on rustic or medieval designs.
Fences (oak or spruce) define stalls and pens inside. Hay bales are non-negotiable for barn builds, they add instant farm authenticity whether stacked in corners or placed as decorative elements. Lanterns and torches handle lighting, while trapdoors and slabs add fine detail to doors and windows.
Planning Your Barn Layout and Dimensions
Jumping straight into construction without planning dimensions usually results in cramped interiors or awkwardly proportioned buildings. A few minutes spent on layout saves hours of rebuilding.
Small vs. Large Barn Designs: Choosing the Right Size
Small barns (roughly 9×9 to 11×13 blocks) work for early-game survival or compact farm setups. They provide enough space for 2-3 animal pens and a small storage area. The footprint stays manageable, and material costs remain reasonable even with limited resources. Height typically ranges from 6-8 blocks to the roof peak.
Medium barns (15×15 to 17×21 blocks) hit the sweet spot for most players. They accommodate separate pens for multiple animal types, dedicated storage sections, and enough room for decorative elements without feeling empty. Heights of 8-10 blocks allow for potential second-story additions. Looking for ways to expand beyond barns, players often explore creative building concepts that complement their farm layouts.
Large barns (20×25 blocks or bigger) suit multiplayer servers or players running industrial-scale farms. These allow for horse stables, separate breeding areas, large haylofts, and elaborate interior designs. They require significant material investment but create impressive visual landmarks.
Odd dimensions (like 11×15 instead of 10×14) often look more natural than perfectly square or symmetrical builds. Real barns aren’t typically perfect cubes.
Interior Space Planning for Animals and Storage
Pen dimensions matter for animal AI and player movement. Each animal pen should be at least 3×3 blocks internally, enough for animals to move without constant collision issues, but compact enough to keep breeding pairs close.
Allocate roughly 1/3 of floor space to animal pens, 1/3 to storage (chests, barrels, composters), and 1/3 to walkways and decorative elements. Cramming too many pens creates a maze. Leaving too much empty space makes the barn feel unfinished.
Plan walkways at least 2 blocks wide for comfortable movement. Nothing’s more annoying than getting stuck on fences while carrying items. Position the main entrance opposite the largest pen area for natural flow.
Step-by-Step Barn Building Tutorial
This tutorial covers a medium-sized barn (15×17 blocks) suitable for most survival worlds. Adjust dimensions as needed, but the structural principles apply to any size.
Constructing the Foundation and Floor
- Mark the perimeter using cobblestone or stone bricks. A 15×17 rectangle provides good proportions for a rectangular barn.
- Build the foundation 1-2 blocks high if the terrain is uneven. Level ground makes interior work easier.
- Fill the floor with spruce planks, oak planks, or packed mud depending on the aesthetic. Dirt floors work for ultra-rustic builds but get visually messy with animals.
- Place corner posts using spruce logs. These extend from the foundation to full height (7-9 blocks for most builds).
Some builders leave the foundation slightly exposed (half-slab height) so the wooden structure sits visibly atop stone, it adds architectural interest.
Building the Walls and Framework
Walls use a timber frame style for maximum authenticity. This means visible vertical and horizontal log supports with planks filling the gaps.
- Place vertical log posts every 3-4 blocks along each wall, connecting floor to roof level.
- Add horizontal log beams at mid-height (around 3-4 blocks up). These connect the vertical posts.
- Fill gaps with spruce or oak planks. This creates the classic half-timbered look.
- Leave openings for doors (3 blocks high, 2 wide for double doors) and windows (2×2 or 2×1 openings).
Mixing block orientations adds texture, vertical logs for posts, horizontal logs for beams, planks filling spaces. Many guides on building structures efficiently emphasize this contrast for visual depth.
Creating an Iconic Barn Roof
Barn roofs typically use gable (peaked) designs. Gambrel (double-sloped) roofs look even more barn-like but require more blocks and planning.
For a basic gable roof:
- Extend walls up 2 additional blocks from the top of the frame to create attic/loft space.
- Use stairs (spruce, dark oak, or brick depending on color choice) to build the sloped roof. Start from the edge and step inward.
- Create the peak by meeting stairs in the center. Use slabs to fill any gaps at the ridge.
- Add slab overhangs on all sides by placing slabs one block beyond the wall line. This creates eaves and adds dimension.
For a gambrel roof (more advanced):
- Build the lower slope at a steeper angle (2 blocks out, 3-4 blocks up).
- Transition to a gentler upper slope (3-4 blocks out, 2 blocks up to the peak).
- The break between slopes creates that distinctive barn profile.
Red terracotta or brick blocks for roofing instantly communicate “barn,” but wooden roofs work fine for rustic or woodland aesthetics.
Advanced Barn Design Features and Details
Basic barns function fine, but details transform them from serviceable buildings into builds worth showing off.
Adding Windows, Doors, and Lighting
Doors: Double oak or spruce doors work for main entrances. For that classic split-door barn look, use trapdoors positioned as the top and bottom halves, players can open just the top for ventilation while keeping animals in.
Windows: Place glass panes in 2×2 or 2×1 openings. Surround them with trapdoors or fence posts to create shutters or window frames. Avoid perfectly symmetrical window placement, real barns have more random fenestration.
Lighting: Lanterns hung from fences or placed on walls provide warm light that fits the aesthetic. Interior lighting prevents mob spawns while keeping the ambiance. String lanterns along the roof peak inside for hayloft lighting. Torches work but look less refined. Players exploring various building techniques and designs often discover creative lighting solutions that enhance barn interiors.
Exterior details: Add a small porch overhang above the main door using stairs and slabs. Place hay bales or barrels near the entrance. A simple dirt path (made with a shovel) leading to the barn doors adds realism.
Building a Hayloft and Second Story
Haylofts maximize vertical space and look authentic. They provide storage for hay bales and create visual interest from inside.
- Install a second floor at about 5-6 blocks above ground level using spruce planks or slabs.
- Create an opening (3×3 blocks) for ladder or stair access from the ground floor.
- Stack hay bales throughout the loft. Arrange them in columns and scattered patterns, not just neat rows.
- Add a loading door on the exterior wall at loft level. Use a trapdoor as the door itself. This mimics real barns where hay gets hoisted into the loft.
- Leave gaps in the loft floor (using trapdoors or leaving open spaces) so light and visual depth reaches both levels.
Haylofts work best in taller barns (9+ blocks to roof peak). In smaller builds, they make the ground floor feel cramped.
Interior Design: Stalls, Pens, and Storage Areas
A barn’s interior separates decoration from function. Layout efficiency directly impacts how enjoyable it is to use during actual farming.
Organizing Animal Pens for Different Livestock
Cattle and sheep: Use 3×4 or 4×4 pens with fence walls. Gate access should face main walkways. Keep breeding pairs in pens sized for 6-8 animals max, overcrowding causes lag and looks messy.
Pigs: Similar size to cattle pens. Consider mud blocks as flooring if running 1.19+ for thematic accuracy.
Chickens: These need less space. 2×3 pens work fine. Place a hopper under the pen with chests attached for automatic egg collection, this is one of the few legitimate farm automation tricks that doesn’t require redstone complexity.
Horses: Require 3×5 stalls minimum due to their size. Create individual stalls along one wall with gates. Placing hay bales in each stall adds realism (though horses only eat hay bales when needed for breeding or healing).
Separate hostile mobs like hoglins (if keeping them from the Nether) with solid walls instead of fences, since they can be aggressive.
Use different fence types to visually distinguish sections, oak fences for horses, spruce for cattle. Mix in fence gates for access that doesn’t require jumping.
Creating Functional Storage with Chests and Barrels
Barrels fit barn aesthetics better than chests, they stack vertically and look like farm storage. Place them along walls in groups of 2-4.
Labeled storage: Use item frames with sample items (wheat, seeds, carrots) above storage containers. This prevents the “which chest has what” problem.
Composters should have dedicated space near crop storage. They convert excess seeds and plants into bonemeal for replanting.
Tool storage: Create a small alcove with an armor stand holding a hoe, or use item frames to display tools. Keeping farming gear in the barn instead of the main base improves workflow.
Feed storage: Dedicate one corner to hay bales and crop storage. Stack hay bales in a 3x3x3 cube for visual bulk. Surround with barrels or chests for processed items.
Creative Barn Variations and Style Ideas
Barns don’t have to follow one template. Different styles suit different biomes, build themes, and player preferences.
Rustic Farmhouse Barn Style
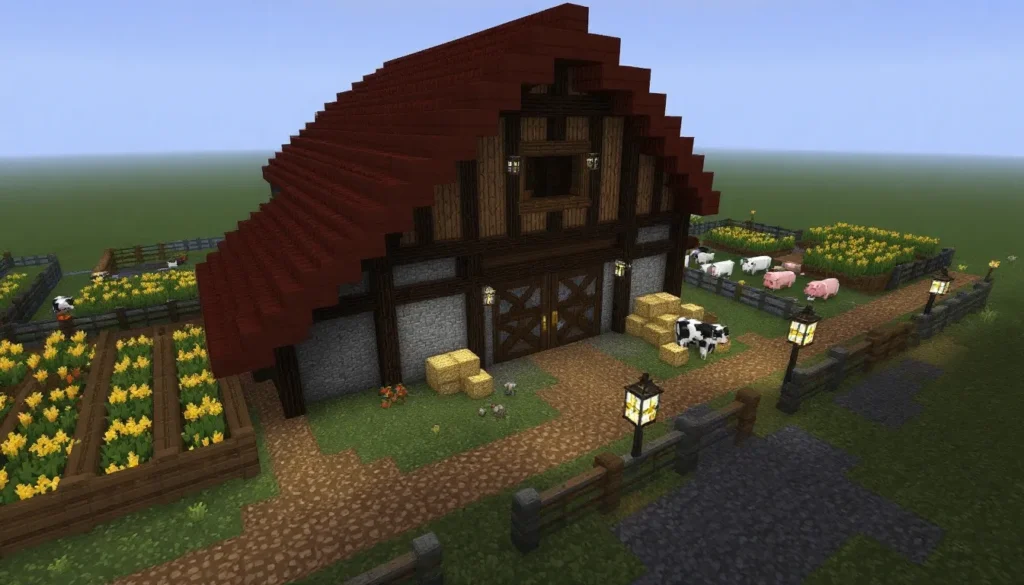
This is the classic “red barn in the countryside” look:
- Red terracotta or brick roofing over spruce wood walls
- Stone foundation that’s visibly 1-2 blocks high
- Hay bales prominently displayed outside, lean them against walls or stack near the door
- Dirt paths connecting to fields and the main house
- Flower boxes made with trapdoors and flowers add cottage charm
- Weather vane on the roof peak using a fence post, banner, and armor stand
This style works perfectly in plains, sunflower plains, or meadow biomes. It’s the build most people picture when they think “Minecraft barn.”
Medieval and Fantasy Barn Designs
For kingdoms, castles, or fantasy servers:
- Darker wood (dark oak or spruce) with prominent cobblestone or stone brick elements
- Asymmetrical designs, add a side extension or lean-to for wagons or storage
- Thatch roofing using hay bale blocks or yellow/brown wool
- Tall, narrow proportions that match medieval architecture styles
- Banners with kingdom colors on exterior walls
- Rougher textures, mix cobblestone, andesite, and stone in irregular patterns
Resources like comprehensive build guides often feature medieval barn layouts that integrate with larger castle or village builds.
Modern Barn with Contemporary Elements
Modern barns merge function with clean aesthetics:
- Concrete blocks (white, gray, or black) mixed with stripped wood logs
- Flat or low-slope roofs using slabs instead of peaked gable designs
- Large glass pane windows for maximized light
- Polished materials, use stripped oak or birch logs, smooth stone
- Minimal decoration, focus on geometric shapes and clean lines
- Integrated redstone for automatic doors or lighting systems
This style suits mesa, badlands, or player-created modern city environments. It’s less about authenticity and more about aesthetic cohesion with contemporary builds.
Common Barn Building Mistakes to Avoid
Even experienced builders hit predictable problems when constructing barns.
Undersizing the interior: New builders often create exterior dimensions without accounting for wall thickness. A 10×10 barn becomes an 8×8 interior after adding walls, barely enough for anything. Plan interior dimensions first, then add walls around them.
Neglecting lighting: Dark corners inside barns spawn mobs. Players log in to find creepers among their cows. Light every corner with torches or lanterns, especially in loft spaces and behind pens.
Flat, boring walls: Solid plank walls look like boxes. Add log posts, horizontal beams, or mix wood types to create texture. The timber frame technique breaks up monotony.
Ignoring terrain: Building on uneven ground creates awkward gaps under walls or requires excessive terraforming. Either level the ground first or design the barn to accommodate slopes (split-level designs can look great).
Over-decorating early: In survival, focus on functionality first. Get the structure built, animals housed, and storage working. Add decorative elements like flower boxes and banners later when resources are plentiful.
Wrong roof pitch: Roofs that are too flat don’t look like barns. Roofs that are too steep waste vertical space and look more like towers. Aim for a slope of roughly 1:1 to 2:1 (rise:run) for authentic barn proportions.
Forgetting animal AI: Pens smaller than 3×3 cause animals to constantly collide and push through fences. Give them enough room to exist without clipping through walls, it’s annoying and breaks immersion.
Integrating Your Barn into a Complete Farm Setup
A barn works best as part of a larger agricultural ecosystem, not an isolated building.
Position barns centrally among crop fields. This minimizes travel time during farming sessions. Place the barn where it’s visible from the main base or entrance path, it should be a landmark.
Connect with paths: Use dirt paths (made by using a shovel on grass) or gravel to link the barn to crop fields, animal grazing areas, and the main house. This creates visual flow and guides players naturally through the farm.
Build supporting structures: Add a silo using white or light gray concrete for grain storage. Create a windmill or water tower nearby for visual interest. A tool shed (smaller than the barn) can house extra equipment. Players looking to expand their builds often reference varied farm designs for inspiration on complementary structures.
Fencing and enclosures: Surround the immediate farm area with fences or hedges (leaf blocks). This defines the farm’s boundaries and keeps wandering animals from escaping into the wilderness.
Outdoor animal areas: Not all livestock needs to live inside the barn 24/7. Create attached paddocks or grazing fields connected to the barn via gates. Animals can spend time outside while still having barn access.
Crop field layout: Position fields in organized rows or plots radiating from the barn. Use scarecrows (armor stands with pumpkin heads) and hay bale stacks as field markers.
Lighting the exterior: Place lanterns on fence posts around the barn perimeter. This prevents mob spawns near the barn at night and creates a welcoming glow.
Redstone integration: For advanced players, connect the barn to automatic crop farms, item sorters, or villager trading halls. Hoppers and hopper minecarts can transport items from fields to barn storage automatically, though this ventures into more technical builds. Community modding sites like Nexus Mods offer barn-related mods that add functional features like automated milking or advanced animal husbandry mechanics for players wanting more depth.
Conclusion
Building a barn in Minecraft rewards both the practical and creative sides of the game. It solves real logistical problems, protecting animals, organizing storage, centralizing farm operations, while adding visual character that turns generic terrain into a homestead worth returning to.
The techniques covered here scale from simple survival builds to elaborate creative showcases. Start with solid fundamentals: choose authentic materials, plan interior space before building walls, and nail the roof proportions. Layer on details like timber framing, haylofts, and thoughtful lighting as skills and resources allow.
Barn building in 2026’s Minecraft (version 1.20+) benefits from the expanded block palette and improved animal AI, making farms more functional and visually diverse than ever. Whether constructing a red-roofed classic in the plains or a modern concrete structure in a mesa biome, a well-executed barn anchors the agricultural side of any world and gives players a reason to invest in their farms beyond pure resource grinding.